Setting Different Template/Design for Post per Category – WordPress

WordPress is providing various ways to set different template on category page but How about if I want to set different template for each category for Single Post Page.

Today I will show how can we achieve this with simple code in single.php

First We need to create single post template for various categories as follow

single_music.php
single_sms.php
single_news.php
single_default.php //For default single post template  for post other than above categories.

Above three files i create because i want to use different single post page template for my music, SMS, and news category respectively. You can create as much file as you can

You can simply create copy of your single.php file and rename it with new template and do the changes that you want for each category single page.

After that open your single.php file remove all code and add following code.

<?php
  $post = $wp_query->post;
  if (in_category('portfolio')) {
      include(TEMPLATEPATH.'/single_music.php');
  } elseif (in_category('news')) {
      include(TEMPLATEPATH.'/single_news.php');
  } elseif(in_category('wordpress')) {
      include(TEMPLATEPATH.'/single_sms.php');
  }
  else{
      include(TEMPLATEPATH.'/single_default.php');
  }
?>

Please comment here if this post is help to you or you have any queries.


Find Distance in km and Miles from latitude and longitude value in PHP

I was wondering How can I find distance between two places using latitude and longitude in PHP. Today I will show you How easily we can calculate the distance between to places in Kilometer and Miles. The example here, takes two values for each place ( latitude and longitude ).

Lets create form to accept latitude and longitude value.

<form method="get" action="">

<p>
	<strong>First location</strong> <span style="font-size:0.8em"><em>(default: Ahmedabad, Gujarat, India)</em></span><br>
	Latitude: <input type="text" name="lat1" value="23.0333">
	Longitude: <input type="text" name="lon1" value="72.6167"><br>
	<span style="font-size:0.8em"><em>Expressed in decimal degrees</em></span>
</p>

<p>
	<strong>Second location</strong> <span style="font-size:0.8em"><em>(default: Surat, Gujarat, India)</em></span><br>
	Latitude: <input type="text" name="lat2" value="21.1700">
	Longitude: <input type="text" name="lon2" value="72.8300"><br>
	<span style="font-size:0.8em"><em>Expressed in decimal degrees</em></span>
</p>

<p>
	<input type="submit" value="Calculate">
	<input type="reset" value="Clear Form">
</p>

<hr>
</form>


Function to find the distance is as follow:

function findDistance($return_in='km') {
	$Rm = 3961; // mean radius of the earth (miles) at 39 degrees from the equator
	$Rk = 6373; // mean radius of the earth (km) at 39 degrees from the equator

	// get values for lat1, lon1, lat2, and lon2
	$t1 = $_REQUEST['lat1'];
	$n1 = $_REQUEST['lon1'];
	$t2 = $_REQUEST['lat2'];
	$n2 = $_REQUEST['lon2'];

	// convert coordinates to radians
	$lat1 = deg2rad($t1);
	$lon1 = deg2rad($n1);
	$lat2 = deg2rad($t2);
	$lon2 = deg2rad($n2);

	// find the differences between the coordinates
	$dlat = $lat2 - $lat1;
	$dlon = $lon2 - $lon1;

	// here's the heavy lifting
	$a  = (double)pow(sin($dlat/2),2) + cos($lat1) * cos($lat2) * pow(sin($dlon/2),2);
	$c  = (double)2 * atan2(sqrt($a),sqrt(1-$a)); // great circle distance in radians
	$dm = $c * $Rm; // great circle distance in miles
	$dk = $c * $Rk; // great circle distance in km

	// round the results down to the nearest 1/1000
	$mi = round( $dm * 1000) / 1000;
	$km = round( $dk * 1000) / 1000;

	// display the result
	if($return_in=="miles")
		return $mi;
	else
		return $km;
}

This function accept one parameter which is not mandatory. To get the result in mile pass ‘miles’ as parameter. Otherwise it returns result in kilometer.

Comment here if you have any queries.

Live Demo Here

Thanks,

WordPress How to set SESSION Custom Variable While Login

Hello friends,

Sometimes we need to set custom session variable for using in our custom code or any other web application which also running parallely with our wordpress installation. Also some time there is need to set and destroy our session variable for our custom web application when wordpress user login or logout.

So first of all we need to enable session in wordpress. I have tested this code in wordpress 3.X. First we need to start the session every time wordpress initialize. To initialize session in wordpress we can use below code.

add_action('init', 'session_manager'); 
function session_manager() {
	if (!session_id()) {
		session_start();
	}
}

This will start the session every time wordpress loads. In this function you can write any other session variable that you need to set default. Then we also need to destroy the session when wordpress user logout. To destroy the session and unset any variable we can use below code:

add_action('wp_logout', 'session_logout');
function session_logout() {
	session_destroy();
}

In this function you can write any other session variable that you want to unset.

Now, How can we set user data into the session variable? Answer is very simple see the below code:

add_filter('authenticate', 'check_login', 10, 3);
function check_login($user, $username, $password) {
     $user = get_user_by('login', $username);
     $_SESSION['userdata']=$user; return $user;
}

Here we add authentication filter of wordpress to set the session. Also we can use this authenticate filter to restrict certain user from login into the wordpress. This function will set the session and later we can use it any where in the wordpress. Also you can set other system session variable so that when any user logs in wordpress he also get logs in other Custom system but condition is both wordpress installation and custom system need to be on same server.

Please post your comment here if this information helps you. I will keep posting more as I come to know more things.

Thank you 🙂


WordPress Insert Post from Front End

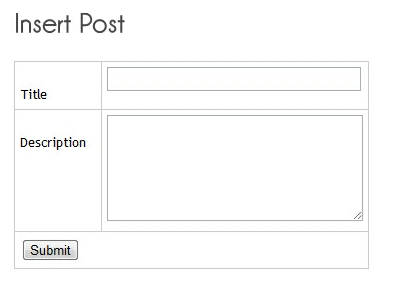
Hi, In this article I will show one example plugin for making post entry from wordpress front end.

Screenshot:

Below is the sample code for the plugin

<?php
/*
Plugin Name: Insert Post Fontend Demo Plugin
Plugin URI: http://thedigilife.com
Description: Example Insert Post Plugin and Approval from admin
Author: The Digi Life
Version: 1.0
Author URI: http://thedigilife.com
*/
add_shortcode('insertpost','display_insert_form');
function display_insert_form($atts)
{
	if ( !empty($_POST) && !wp_verify_nonce($_POST['insert'],'insert_form') )
	{
		echo 'Sorry, Problem in submitting form';
	}
	else
	{
		// process form data
		$post_data = array(
		'post_title' => $_POST['title'],
		'post_content' => $_POST['description'],
		'post_status' => 'pending',
		'post_author' => 1,
		'post_category' => null
		);
		if($post_id = wp_insert_post($post_data)) echo "Data Succcessfully added";
	}
	?>
	<form action="" method="post" name="insert_form">
		<table>
			<tr>
				<td><label>Title</label></td>
				<td><input type="text" name="title" id="title"></td>
			</tr>
			<tr>
				<td><label>Description</label></td>
				<td><textarea rows="7" cols="10" name="description" id="description"></textarea></td>
			</tr>
			<tr>
				<td colspan="2"><input type="submit" id="button"></td>
			</tr>
			<?php wp_nonce_field('insert_form','insert'); ?>
		</table>
	</form>
	<?php
}

We can insert post in wordpress using wp_insert_post which is explained Here

In this sample I have created one sample shortcode for displaying plugin on front and in short code function I have added form to display and before that if post is submitted we will insert the post into database.

 Download | Source Code


WordPress Admin listing Table and Paging

Almost svery wordpress plugin developer needs to make Admin side listing for any custom table. This table generally store information that is gather from website and/or end users. Listing of table help to view the data in list format. It also allow admin to add, edit and Delete the data. It also allow bulk action for delete.

During my plugin development, I always wonder that how to make admin side listing for custom table which looks same as post and page listing. Also how can I make pagination for the table. I have searched for pagination and found many class to use that you can also found in my previous post. But I want to make it looks like as below:
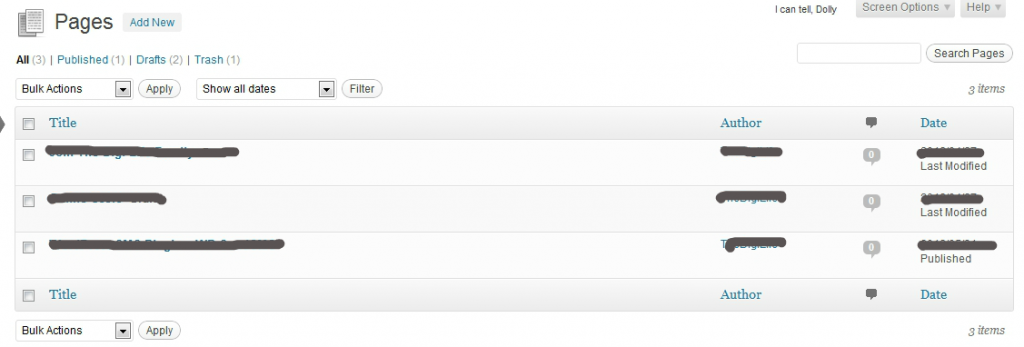


After Searching for this I come to know that wordpress also providing the class for listing and paging for custom table. Class Name is Wp_List_Table. Wp_List_Table class is used to create admin screens for the wordpress. We need to extends this class and overload its method to use it.

Now the question is how to use this class and create admin side listing for our created custom table.

WordPress is providing one very good example plugin to see how we can create admin side listing for the custom table. You can find the example plugin Here

This example display code using Array of data. Instead of data we can use any database table. For creating your own table listing copy paste data into your file and follow below steps

Step 1: Create a new file under your plugin directory

Step 2: Include WP_List_Table class file into your file as follow:

if(!class_exists('WP_List_Table')){
 require_once( ABSPATH . 'wp-admin/includes/class-wp-list-table.php' );
}

Step 3: Create class for your custom table and extends it to WP_List_Table.

For this you can copy whole class from example plugin and paste it in your plugin file and rename the class name from TT_Example_List_Table to something else which is preferable for your plugin.

Step 4: If you are using database table for fetching data which will always a case in real life,  then delete the example data array.

We will fetch the data from database when it will be needed. Remove the below code:

var $example_data = array(
	 array(
	 'ID' => 1,
	 'title' => '300',
	 'rating' => 'R',
	 'director' => 'Zach Snyder'
	 ),
	 array(
	 'ID' => 2,
	 'title' => 'Eyes Wide Shut',
	 'rating' => 'R',
	 'director' => 'Stanley Kubrick'
	 ),
	 array(
	 'ID' => 3,
	 'title' => 'Moulin Rouge!',
	 'rating' => 'PG-13',
	 'director' => 'Baz Luhrman'
	 ),
	 array(
	 'ID' => 4,
	 'title' => 'Snow White',
	 'rating' => 'G',
	 'director' => 'Walt Disney'
	 ),
	 array(
	 'ID' => 5,
	 'title' => 'Super 8',
	 'rating' => 'PG-13',
	 'director' => 'JJ Abrams'
	 ),
	 array(
	 'ID' => 6,
	 'title' => 'The Fountain',
	 'rating' => 'PG-13',
	 'director' => 'Darren Aronofsky'
	 ),
	 array(
	 'ID' => 7,
	 'title' => 'Watchmen',
	 'rating' => 'R',
	 'director' => 'Zach Snyder'
	 )
	 );

Step 5: Setting up the naming and some configs for table listing.

function __construct(){
 global $status, $page;

 //Set parent defaults
 parent::__construct( array(
 'singular' => 'movie', //singular name of the listed records
 'plural' => 'movies', //plural name of the listed records
 'ajax' => false //does this table support ajax?
 ) );

 }

Step 6: Set Default common value display for the every column using.

function column_default($item, $column_name){
 switch($column_name){
 case 'rating':
 case 'director':
 return $item[$column_name];
 default:
 return print_r($item,true); //Show the whole array for troubleshooting purposes
 }
 }

This method is called when the parent class can’t find a method  specifically build for a given column. Generally, it’s recommended to include one method for each column you want to render, keeping your package class neat and organized. For example, if the class needs to process a column named ‘title’, it would first see if a method named $this->column_title() exists – if it does, that method will be used. If it doesn’t, this one will be used. Generally, you should try to use custom column methods as much as  possible.

Step 7: If you have any column column which need to be display diffidently from other in the view. We can create this by below syntax

function column_<field name>($item){
//Some Code
return "formated text";
}

In example below is given

function column_title($item){

 //Build row actions
 $actions = array(
 'edit' => sprintf('<a href="?page=%s&action=%s&movie=%s">Edit</a>',$_REQUEST['page'],'edit',$item['ID']),
 'delete' => sprintf('<a href="?page=%s&action=%s&movie=%s">Delete</a>',$_REQUEST['page'],'delete',$item['ID']),
 );

 //Return the title contents
 return sprintf('%1$s <span style="color:silver">(id:%2$s)</span>%3$s',
 /*$1%s*/ $item['title'],
 /*$2%s*/ $item['ID'],
 /*$3%s*/ $this->row_actions($actions)
 );
 }

step 8: Display Check boxes for the bulk action.

&nbsp;function column_cb($item){
  return sprintf(
'<input type="checkbox" name="%1$s[]" value="%2$s" />',
/*$1%s*/ $this->_args['singular'], //Let's simply repurpose the table's singular label ("movie")
/*$2%s*/ $item['ID'] //The value of the checkbox should be the record's id
  );
}

step 9: get all column. here we specify which column to get for display.

This method dictates the table’s columns and titles. This should return an array where the key is the column slug (and class) and the value  is the column’s title text. If you need a checkbox for bulk actions, refer to the $columns array below.

function get_columns(){
 $columns = array(
 'cb' => '<input type="checkbox" />', //Render a checkbox instead of text
 'title' => 'Title',
 'rating' => 'Rating',
 'director' => 'Director'
 );
 return $columns;
 }

Step 10: Decide which column to make sortable. This Method is optional.

If you want one or more columns to be sortable (ASC/DESC toggle), you will need to register it here. This should return an array where the key is the column that needs to be sortable, and the value is db column to sort by. Often, the key and value will be the same, but this is not always the case (as the value is a column name from the database, not the list table).
This method merely defines which columns should be sortable and makes them clickable – it does not handle the actual sorting. You still need to detect the ORDERBY and ORDER query string variables within prepare_items() and sort your data accordingly (usually by modifying your query).

function get_sortable_columns() {
 $sortable_columns = array(
 'title' => array('title',true), //true means its already sorted
 'rating' => array('rating',false),
 'director' => array('director',false)
 );
 return $sortable_columns;
 }

Step 11: Set up bulk action for selected check boxes. This method is optional

If you need to include bulk actions in your list table, this is the place to define them. Bulk actions are an associative array in the format ‘slug’=>’Visible Title’

If this method returns an empty value, no bulk action will be rendered. If you specify any bulk actions, the bulk actions box will be rendered with the table automatically on display().

Also note that list tables are not automatically wrapped in <form> elements, so you will need to create those manually in order for bulk actions to function.

function get_bulk_actions() {
 $actions = array(
 'delete' => 'Delete'
 );
 return $actions;
 }

Now we also need to set up what to do when any one of the bulk action has been called. This can done using below method. This method is optional.

function process_bulk_action() {
 //Detect when a bulk action is being triggered...
 if( 'delete'===$this->current_action() ) {
 wp_die('Items deleted (or they would be if we had items to delete)!');
 }
 }

step 12: This is most important step for the listing the table and fetching the database values.

Here find and delete the code

$data = $this->example_data;

Below that there is function

function usort_reorder($a,$b){
 $orderby = (!empty($_REQUEST['orderby'])) ? $_REQUEST['orderby'] : 'title'; //If no sort, default to title
 $order = (!empty($_REQUEST['order'])) ? $_REQUEST['order'] : 'asc'; //If no order, default to asc
 $result = strcmp($a[$orderby], $b[$orderby]); //Determine sort order
 return ($order==='asc') ? $result : -$result; //Send final sort direction to usort
 }
 usort($data, 'usort_reorder');

Also delete this code this code is now no more needed as we are sorting through database query. Add The below Code here

global $wpdb;
 $orderby = (!empty($_REQUEST['orderby'])) ? $_REQUEST['orderby'] : 'sent_time'; //If no sort, default to title
 $order = (!empty($_REQUEST['order'])) ? $_REQUEST['order'] : 'asc'; //If no order, default to asc
 $query='select * from <Table_name> order by '. $orderby . ' ' .$order;
 $data = $wpdb->get_results($query, 'ARRAY_A');

Here first we have called global variable which is available in wordpress for the database operation. ‘$wpdb’ . Then set order by and order values and get the data.

Every things else remain as it is in this function no need to change.

step 13: Now we need to create function which will be called when page is going to display. We just need to create object of our newly created class.

//Create an instance of our package class...
 $testListTable = new TT_Example_List_Table();
 //Fetch, prepare, sort, and filter our data...
 $testListTable->prepare_items();

And Display the data

<!-- Forms are NOT created automatically, so you need to wrap the table in one to use features like bulk actions -->
 <form id="movies-filter" method="get">
 <!-- For plugins, we also need to ensure that the form posts back to our current page -->
 <input type="hidden" name="page" value="<?php echo $_REQUEST['page'] ?>" />
 <!-- Now we can render the completed list table -->
 <?php $testListTable->display() ?>
 </form>

Conclusion

This will create both listing and pagination for custom table in wordpress. I think this is really easy to use it rather creating table by self and searching for the pagination class and adding them to the code.

This helps developers to create very neat and clean code. Also, This code is fully compatible with wordpress.

Please comment your queries, Suggestion, Like or Dislike post here.

Enjoy..!!!

Note: This example which I have used which is already available in wordpress listing table plugin. I have explained using database connection which was missing in the plugin. Hope this will helps every wordpress developers.

Thank you….
Add Pagination Into WordPress Admin For Plugin

Often in many application, such as in WordPress Plugin, we will need to deal with list of records. As the records grow, more records will need to be displayed. There is a catch though, if you retrieve all the records at one go because it will slow the system down.

In order to have a better user experience for record listing, paging comes into play. It’ll not only help to organize the records by limiting the number of records you want to show per page, it also cuts the down the time of retrieving records. Therefore, pagination plays a very important part in providing a great user experience when interacting with the data.

Imaging if you have a list of 1000 or more records that you want to display. Without pagination, listing all the records will definitely take quite awhile and also increase the load for the database server when executing the query. This is not very efficient, even though retrieving records from database can be cheap.

Now let’s say we want to add in pagination into the 1000 records, by specifying the limit, it will only shows the exact amount of records you want to view. This is a huge benefit for the database server load, because we are not retrieving all the records at once.

Below examples are 2 different type of pagination and a demo on how to add pagination into WordPress Plugin.

Simple PHP Pagination Class

Copy the following code and save as pager.php, this file will be the pagination class. With this pagination classfrom Happycodings, it’d help us add pagination to the list of records easily.

<?php
function findStart($limit) {
	if ((!isset($_GET['page'])) || ($_GET['page'] == "1")) {
		$start = 0;
		$_GET['page'] = 1;
	} else {
		$start = ($_GET['page']-1) * $limit;
	}
	return $start;
}

/*
 * int findPages (int count, int limit)
 * Returns the number of pages needed based on a count and a limit
 */
function findPages($count, $limit) {
	$pages = (($count % $limit) == 0) ? $count / $limit : floor($count / $limit) + 1; 
	return $pages;
} 

/*
* string pageList (int curpage, int pages)
* Returns a list of pages in the format of "« < [pages] > »"
**/
function pageList($curpage, $pages)
{
	$page_list = ""; 

	/* Print the first and previous page links if necessary */
	if (($curpage != 1) && ($curpage)) {
		$page_list .= ' <a href=" '.$_SERVER['PHP_SELF'].'?page=1" title="First Page">«</a> ';
	} 

	if (($curpage-1) > 0) {
		$page_list .= '<a href=" '.$_SERVER['PHP_SELF']."?page=".($curpage-1).'" title="Previous Page">&lt;</a> ';
	} 

	/* Print the numeric page list; make the current page unlinked and bold */
	for ($i=1; $i<=$pages; $i++) {
		if ($i == $curpage) {
			$page_list .= "<b>".$i."</b>";
		} else {
			$page_list .= '<a href=" '.$_SERVER['PHP_SELF'].'?page='.$i.'" title="Page'.$i.'">'.$i.'</a>';
		}
		$page_list .= " ";
	} 

	/* Print the Next and Last page links if necessary */
	if (($curpage+1) <= $pages) {
		$page_list .= '<a href="'.$_SERVER['PHP_SELF']."?page=".($curpage+1).'" title="Next Page">></a> ';
	} 

	if (($curpage != $pages) && ($pages != 0)) {
		$page_list .= '<a href="'.$_SERVER['PHP_SELF']."?page=".$pages.'" title="Last Page">»</a> ';
	}
	$page_list .= "</td>\n"; 
	return $page_list;
}

/*
* string nextPrev (int curpage, int pages)
* Returns "Previous | Next" string for individual pagination (it's a word!)
*/
function nextPrev($curpage, $pages) {
	$next_prev = ""; 

	if (($curpage-1) <= 0) {
		$next_prev .= "Previous";
	} else {
		$next_prev .= '<a href="'.$_SERVER['PHP_SELF']."?page=".($curpage-1).'">Previous</a>';
	} 

	$next_prev .= " | "; 

	if (($curpage+1) > $pages) {
		$next_prev .= "Next";
	} else {
		$next_prev .= '<a href="'.$_SERVER['PHP_SELF']."?page=".($curpage+1).'">Next</a>';
	}
	return $next_prev;
}
?>

Once you have the pager.php, instantiate the class as below. Change the $limit to your desired number of records to show per page and finally get the page list by echoing it out.

/* Instantiate class */
require_once("pager.php");
$p = new Pager; 

/* Show many results per page? */
$limit = 100; 

/* Find the start depending on $_GET['page'] (declared if it's null) */
$start = $p->findStart($limit); 

/* Find the number of rows returned from a query; Note: Do NOT use a LIMIT clause in this query */
$count = mysql_num_rows(mysql_query("SELECT field FROM table")); 

/* Find the number of pages based on $count and $limit */
$pages = $p->findPages($count, $limit); 

/* Now we use the LIMIT clause to grab a range of rows */
$result = mysql_query("SELECT * FROM table LIMIT ".$start.", ".$limit); 

/* Now get the page list and echo it */
$pagelist = $p->pageList($_GET['page'], $pages);
echo $pagelist; 

/* Or you can use a simple "Previous | Next" listing if you don't want the numeric page listing */
//$next_prev = $p->nextPrev($_GET['page'], $pages);
//echo $next_prev;
/* From here you can do whatever you want with the data from the $result link. */

Digg Style Pagination

As the above simple pagination class is enough for us to display a list of page numbering for the records, but what will happen if there are a few hundreds of pages, isn’t the row of page numbering going to be very long too?

Here is another nice Digg Style Pagination class that you can consider if you think there will be a lot of pages for your records.

Download the pagination.class.php.

Go through the guide to customize the style or desired output for the paging you want. Now, to give you a clearer view on how to add this Digg Style Pagination class. Check out below to find out how to add the Digg Style Pagination to a WordPress Plugin.

How To Add Pagination To WordPress Plugin?

If you are building a WordPress plugin that require to display a list of records from database. As records get huge, you will need to have pagination so that you can organize your records well.

First, you will need to download the pagination.class.php and save it in your WordPress Plugin folder.

Next, in the PHP file that you want to list your records, insert the following code. Below are some of the methods we used from the pagination class. For the full list of methods, please refer to Digg Style Pagination Class Help Page.

Note that you will need to change the SQL query, pagination class configuration and table fields, in order to work nicely with your WordPress Plugin.

<?php

$items = mysql_num_rows(mysql_query("SELECT * FROM wp_table;")); // number of total rows in the database

if($items > 0) {
	$p = new pagination;
	$p->items($items);
	$p->limit(30); // Limit entries per page
	$p->target("admin.php?page=list_record");
	$p->currentPage($_GET[$p->paging]); // Gets and validates the current page
	$p->calculate(); // Calculates what to show
	$p->parameterName('paging');
	$p->adjacents(1); //No. of page away from the current page

	if(!isset($_GET['paging'])) {
		$p->page = 1;
	} else {
		$p->page = $_GET['paging'];
	}

	//Query for limit paging
	$limit = "LIMIT " . ($p->page - 1) * $p->limit . ", " . $p->limit;

} else {
	echo "No Record Found";
}

?>

<!-- Now we'll display the list of records -->

<div class="wrap">
	<h2>List of Records</h2>

	<div class="tablenav">
		<div class='tablenav-pages'>
			<?php echo $p->show(); // Echo out the list of paging. ?>
		</div>
	</div>

	<table class="widefat">
		<thead>
			 <tr>
				 <th>ID</th>
				 <th>Full Name</th>
				 <th>Email</th>
			 </tr>
		</thead>
		<tbody>
		<?php
		$sql = "SELECT * FROM $wp_table ORDER BY id DESC $limit";
		$result = mysql_query($sql) or die ('Error, query failed');

		if (mysql_num_rows($result) > 0 ) {
			while ($row = mysql_fetch_assoc($result)) {
			$id = $row['id'];
			$fullname = $row['fullname'];
			$email = $row['email'];
			?>
			<tr>
				<td><?php echo $id; ?></td>
				<td><?php echo $fullname; ?></td>
				<td><?php echo $email; ?></td>
			</tr>
			<?php 
			}
		} else { ?>
			<tr>
				<td>No Record Found!</td>
			<tr>
		<?php } ?>
		</tbody>
	</table>
</div>

Now you know How to Add a Digg Style Pagination to a WordPress Plugin, it should make your listing of data much more efficient. Pagination saves your time and bandwidth so you can concentrate more on other implementing issues.

Still not sure about this tutorial on adding pagination? Or simply have an idea to share? Feel free to contact us or leave a comment here!


Adding New Fields to the attachment of wordpress

Recently I was developing plugin for image features. I have to add some fields to the attachment window of wordpress or I can say in Add media box.

We can achieve this by using two hooks of wordpress.
“attachment_fields_to_edit” and “attachment_fields_to_save”;

attachment_fields_to_edit

function get_attachment_fields_to_edit($post,$errors=null){
 // Some Code
 $form_fields = apply_filters("attachment_fields_to_edit", $form_fields, $post);
 // Some Code
 }
  • $form_fields is a special array which will be described in detail in a moment.
  • $post is the attachment as an object (attachments are treated as post objects in WordPress).

attachment_fields_to_save

functionmedia_upload_form_handler(){
	//Some Code
	$post=apply_filters("attachment_fields_to_save",$post,$attachment);
	//Some Code
}
  • $post is the attachment as an array (attachments are treated as post objects in WordPress).
  • $attachment is the attachment part of the form $_POST which will include the fields setup through the attachment_fields_to_edit hook.

Note: Be careful in your code, as $post is sent to one function as an object and to the other as an array.

We will add this fields information to Custom Fields.

How to add this Fields to Custom Fields for Working is Properly

The new fields being added will be saved as post meta, just like the custom fields section of the post/page edit screen. Fields prefixed with an underscore (_my_custom_field) will not be listed in the drop down of available custom fields on the post/page screen; all other existing post meta fields will be listed. We can use this knowledge to hide the fields we’re adding to the media form, since they aren’t relevant for posts/pages.

There is a similar rule to keep in mind when choosing the $form_fields array key to use for your new field. Here, if you use an underscore ($form_fields[‘_my_custom_field’]) your field will be skipped and will not be added to the form.

So in order to show our fields in the media form, but also not list them in the page/post custom fields drop down, we must combine both methods. This will invlove both the edit and save functions we’ll be creating. For the ‘attachment_fields_to_edit‘ hook we’ll set the $form_fields keys up to not have underscore prefixes, and for the ‘attachment_fields_to_save‘ hook we’ll prefix our fields with an underscore before saving them as post meta. This is a workaround worth doing in order to not muddy our users’ interface with unneeded info.

Hook 1: attachment_fields_to_edit

<?php
/**
 * Adding our custom fields to the $form_fields array
 *
 * @param array $form_fields
 * @param object $post
 * @return array
 */
function my_image_attachment_fields_to_edit($form_fields, $post) {
	// $form_fields is a special array of fields to include in the attachment form
	// $post is the attachment record in the database
	// $post->post_type == 'attachment'
	// (attachments are treated as posts in WordPress)
	// add our custom field to the $form_fields array
	// input type="text" name/id="attachments[$attachment->ID][custom1]"
	$form_fields["custom1"] = array(
	"label" => __("Custom Text Field"),
	"input" => "text", // this is default if "input" is omitted
	"value" => get_post_meta($post->ID, "_custom1", true)
	);
	// if you will be adding error messages for your field,
	// then in order to not overwrite them, as they are pre-attached
	// to this array, you would need to set the field up like this:
	$form_fields["custom1"]["label"] = __("Custom Text Field");
	$form_fields["custom1"]["input"] = "text";
	$form_fields["custom1"]["value"] = get_post_meta($post->ID, "_custom1", true);
	return $form_fields;
}
// attach our function to the correct hook
add_filter("attachment_fields_to_edit", "my_image_attachment_fields_to_edit", null, 2);

The $form_fields array has several options for including different types of inputs and custom content. I’ve compiled the various methods below with notes and screenshots of how they render in the form.

Text Input

// input type="text"
$form_fields["custom1"]["label"] = __("Custom Text Field");
$form_fields["custom1"]["input"] = "text"; // this is default if "input" is omitted
$form_fields["custom1"]["value"] = get_post_meta($post->ID, "_custom1", true);

Hook 2: attachment_fields_to_save

Saving your custom fields is a much simpler process than adding them to the form; just check if your field is set and update its value as post meta. Remeber to prefix your field with an underscore when saving to hide it on the post/page edit screen.

/**
 * @param array $post
 * @param array $attachment
 * @return array
 */
function my_image_attachment_fields_to_save($post, $attachment) {
 // $attachment part of the form $_POST ($_POST[attachments][postID])
 // $post attachments wp post array - will be saved after returned
 // $post['post_type'] == 'attachment'
 if( isset($attachment['my_field']) ){
 // update_post_meta(postID, meta_key, meta_value);
 update_post_meta($post['ID'], '_my_field', $attachment['my_field']);
 }
 return $post;
}

You can also add errors here that will automatically be displayed below your field in the form. The$post['errors'] array gets merged with the $form_fields array before being sent through theattachment_fields_to_edit hook.

/**
 * @param array $post
 * @param array $attachment
 * @return array
 */
function my_image_attachment_fields_to_save($post, $attachment) {
 if( isset($attachment['my_field']) ){
 if( trim($attachment['my_field']) == '' ){
 // adding our custom error
 $post['errors']['my_field']['errors'][] = __('Error text here.');
 }else{
 update_post_meta($post['ID'], 'my_field', $attachment['my_field']);
 }
 }
 return $post;
}

Thanks to http://net.tutsplus.com

I have posted here for my future reference.


How to make your site listed in major Search Engine

Google

Google is the probably best engine to be listed in. It is one of the most widely searched and they offer tools to help you in designing your page.

There are two things you need to do if you want your page listed in google.

First, submit your site name to the Google add url form. After that, I highly suggest you sign up for their sitemap program. If you need help designing your sitemap to submit, you can use mine and just edit the urls to what you want. The syntax is easy enough to understand, just replace my links with the important pages of your site. Example sitemap is as below:

<?xml version="1.0" encoding="UTF-8"?>
<urlset xmlns="http://www.google.com/schemas/sitemap/0.84"
xmlns:xsi="http://www.w3.org/2001/XMLSchema-instance"
xsi:schemaLocation="http://www.google.com/schemas/sitemap/0.84
http://www.google.com/schemas/sitemap/0.84/sitemap.xsd">
	<url>
		<loc>http://www.thedigilife.com/</loc>
		<changefreq>weekly</changefreq>
		<priority>0.5</priority>
	</url>
	<url>
		<loc>http://www.thedigilife.com/example/</loc>
		<changefreq>monthly</changefreq>
		<priority>0.5</priority>
	</url>
</urlset>

feel free to copy and paste and edit to your liking. Once you are done, place the sitemap.xml in your home directory and submit to Google. The sitemap program will tell you where your page is ranked, what search results show your page, and if your site has any errors, like broken links.

At this point, create a robots.txt file, and place it in your home directory, if you haven’t already made one.
Example robots.txt as below:

User-agent: *
Disallow: /design
Disallow: /africa
Sitemap: http://www.garyshood.com/sitemap.xml

user-agent: googlebot-video
Disallow: /

, when creating yours however, the only line you really need is the following:

User-agent: *


Yahoo! & Lycos

Yahoo! is another great engine to have your page listed in. Submit your url again to Yahoo! here. Yahoo! does not have a sitemap program, but there is something similar you can do. If your website runs PHP, there is a script you can use to convert the sitemap.xml you used for Google into a map that you can use for Yahoo!. I read this article to make the yahoo.txt file that can be used as a yahoo sitemap. To do the same, below is the PHP Script.

<?php  
/* 
iELLIOTT.com's Google 2 Yahoo Sitemap Converter 
Version: 1.0 10/31/2005 

Use this script at your own risk.  No Warranty or Support can be provided. 
If you use this script, please give credit to iELLIOTT.com and link back to: 
http://www.ielliott.com/2005/10/31/google-to-yahoo-sitemap/ 

This script is subject to the following license: 
http://creativecommons.org/licenses/by-sa/2.5/ 

CUSTOMIZATION 
============== 
$input_file is the URL location of your exsisting Google sitemap XML file (must end with .xml)   

$output_file is the name of the file you wish to write the Yahoo sitemap data to.  Default is yahoo.txt, but if you've changed the name to something else, it must be reflected here (must end with .txt).  Also be sure that you CHMOD your $output_file to 777 on your server.
*/ 

$input_file = "sitemap.xml"; 
$output_file = "yahoo.txt"; 
?> 

<?php 

set_time_limit(0); 

header("Content-Type: text/plain"); 
echo " Time: ".gmdate("r")."\n"; 
echo "-------------------------------------------------------------\n"; 

$xml = xml_parser_create("UTF-8"); 

xml_parser_set_option($xml, XML_OPTION_SKIP_WHITE, 1); 
xml_parser_set_option($xml, XML_OPTION_CASE_FOLDING, 1); 

xml_set_element_handler($xml, "XMLElementStart", "XMLElementEnd"); 
xml_set_character_data_handler ($xml, "XMLCData"); 

$xml_level = 0; 
$xml_isloc = FALSE; 
$i = 0; 

$fpop = fopen($output_file, "wb"); 
$fp = fopen($input_file, "rb"); 

if ($fp) 
{ 
    while(!feof($fp)) 
    { 
        $s = fgets($fp, 10000); 
        xml_parse($xml, $s); 
    } 
    $ret = xml_parse($xml, "", TRUE); 
    fclose($fp); 
} 
fclose($fpop); 

echo "-------------------------------------------------------------\n"; 
echo " Total $i URLS\n"; 
echo " Time: ".gmdate("r")."\n"; 

function XMLElementStart($xml, $element, $attribs) 
{ 
    global $xml_level, $xml_isloc; 

    $xml_level++; 
    if ($xml_level == 3 && $element == "LOC") $xml_isloc = TRUE; 
} 

function XMLElementEnd($xml, $element) 
{ 
    global $xml_level, $xml_isloc; 

    if ($xml_level == 3 && $element == "LOC") $xml_isloc = FALSE; 
    $xml_level--; 

} 

function XMLCData($xml, $data) 
{ 
    global $xml_level, $xml_isloc, $fpop, $i; 

    if($xml_isloc) 
    { 
        $i++; 
        echo " $data\n"; 
        fwrite($fpop, $data."\n"); 
    } 
} 

?>

Copy and upload it to your server in the same directory as your sitemap.xml. I found this script here. Run the script through your browser, and it will generate a file called yahoo.txt. Example yahoo.txt is as follow:

http://www.thedigilife.com/
http://www.thedigilife.com/example/

After you generate this yahoo.txt file, go to the yahoo submission url again, and for the url, put the location of your yahoo.txt and submit. Lycos is included in this because it uses the Yahoo! search engine to find websites.


MSN / Bing

MSN was the quickest to add my site to their search engine. Once again, just submit your site to the MSN add url form here. Soon, if you have AWStats setup or a similar website stat list for your page, you will notice the MSN bot has visited your page and hopefully added you to the index.


Ask Jeeves

Ask Jeeves the hardest search engine to be listed in. There is no free add url form for this search engine. You do have the option of paying Ask a fee to be included in the results, but I wouldn’t suggest it, since I have gotten this site in Ask for free, it just took a lot longer. Submit your site to the Open Directory Project here. You have to pick a category for your page and provide a good description on why you should be listed to be accepted. If your site does get popular enough to be listed in the other search engines, there is still a good chance the AskJeeves bot will visit your page and include you in the search directory.


Tips To Get Listed

Content is the most important thing to get listed. Search engines will not add your page if you have an “Under Construction” or “Coming Soon” notice on every single page.

The more websites that link to your page, the faster you will get listed. Put your website in your signature in online forums that you visit.

Search engines may take up a week to list you, be patient and make sure you have some type of web stats so you can tell if the bots have visited your site yet.

Note: This Post is for my future use only.

Email Crawler Script PHP MySQL

This script is useful for crawling the emails from the website in recursive manner. this is really very easy class to call and starting crawling emails.

Note: I found it somewhere on internet. I put it here for my future reference. It also useful to people who wants this type of script.

emailcrawler.php

<?php
/*
Written by: Aziz S. Hussain 
Email: azizsaleh@gmail.com 
Website: www.azizsaleh.com 
Produced under GPL License 
*/ 
/*****/ 
Email address scraper based on a URL.
*/
class scraper
{
	// URL that stores first URL to start
	var $startURL; 

	// List of allowed page extensions
	var $allowedExtensions = array('.css','.xml','.rss','.ico','.js','.gif','.jpg','.jpeg','.png','.bmp','.wmv','.avi','.mp3','.flash','.swf','.css'); 

	// Which URL to scrape
	var $useURL; 

	// Start path, for links that are relative
	var $startPath; 

	// Set start path
	function setStartPath($path = NULL){
		if($path != NULL)
		{
			$this->startPath = $path;
		} else {
			$temp = explode('/',$this->startURL);
			$this->startPath = $temp[0].'//'.$temp[2];
		}
	} 

	// Add the start URL
	function startURL($theURL){
		// Set start URL
		$this->startURL = $theURL;
	} 

	// Function to get URL contents
	function getContents($url)
	{
		$ch = curl_init(); // initialize curl handle
		curl_setopt($ch, CURLOPT_HEADER, 0);
		curl_setopt($ch, CURLOPT_VERBOSE, 0);
		curl_setopt($ch, CURLOPT_USERAGENT, "Mozilla/4.0 (compatible;)");
		curl_setopt($ch, CURLOPT_AUTOREFERER, false);
		curl_setopt($ch, CURLOPT_CONNECTTIMEOUT,7);
		curl_setopt($ch, CURLOPT_REFERER, 'http://'.$this->useURL);
		curl_setopt($ch, CURLOPT_URL,$url); // set url to post to
		curl_setopt($ch, CURLOPT_FAILONERROR, 1);
		curl_setopt($ch, CURLOPT_FOLLOWLOCATION, 1);// allow redirects
		curl_setopt($ch, CURLOPT_RETURNTRANSFER,1); // return into a variable
		curl_setopt($ch, CURLOPT_TIMEOUT, 50); // times out after 50s
		curl_setopt($ch, CURLOPT_POST, 0); // set POST method
		$buffer = curl_exec($ch); // run the whole process
		curl_close($ch);
		return $buffer;
	}

	// Actually do the URLS
	function startScraping()
	{
		// Get page content
		$pageContent = $this->getContents($this->startURL);
		echo 'Scraping URL: '.$this->startURL.PHP_EOL; 

		// Get list of all emails on page
		preg_match_all('/([\w+\.]*\w+@[\w+\.]*\w+[\w+\-\w+]*\.\w+)/is',$pageContent,$results);
		// Add the email to the email list array
		$insertCount=0;
		foreach($results[1] as $curEmail)
		{
			$insert = mysql_query("INSERT INTO `emaillist` (`emailadd`) VALUES ('$curEmail')");
			if($insert){$insertCount++;}
		} 

		echo 'Emails found: '.number_format($insertCount).PHP_EOL; 

		// Mark the page done
		$insert = mysql_query("INSERT INTO `finishedurls` (`urlname`) VALUES ('".$this->startURL."')"); 

		// Get list of new page URLS is emails were found on previous page
		preg_match_all('/href="([^"]+)"/Umis',$pageContent,$results);
		$currentList = $this->cleanListURLs($results[1]); 

		$insertURLCount=0;
		// Add the list to the array
		foreach($currentList as $curURL)
		{
			$insert = mysql_query("INSERT INTO `workingurls` (`urlname`) VALUES ('$curURL')");
			if($insert){$insertURLCount++;}
		} 

		echo 'URLs found: '.number_format($insertURLCount).PHP_EOL;
		$getURL = mysql_fetch_assoc(mysql_query("SELECT `urlname` FROM `workingurls` ORDER BY RAND() LIMIT 1"));
		$remove = mysql_query("DELETE FROM `workingurls` WHERE `urlname`='$getURL[urlname]' LIMIT 1"); 

		// Get the new page ready
		$this->startURL = $getURL['urlname'];
		$this->setStartPath(); 

		// If no more pages, return
		if($this->startURL == NULL){ return;}
		// Clean vars
		unset($results,$pageContent);
		// If more pages, loop again
		$this->startScraping();
	} 

	// Function to clean input URLS
	function cleanListURLs($linkList)
	{
		foreach($linkList as $sub => $url)
		{
			// Check if only 1 character - there must exist at least / character
			if(strlen($url) <= 1){unset($linkList[$sub]);}
			// Check for any javascript
			if(strpos('javascript',$url)){unset($linkList[$sub]);}
			// Check for invalid extensions
			str_replace($this->allowedExtensions,'',$url,$count);
			if($count > 0){ unset($linkList[$sub]);}
			// If URL starts with #, ignore
			if(substr($url,0,1) == '#'){unset($linkList[$sub]);} 

			// If everything is OK and path is relative, add starting path
			if(substr($url,0,1) == '/' || substr($url,0,1) == '?' || substr($url,0,1) == '='){
			$linkList[$sub] = $this->startPath.$url;
			}
		}
		return $linkList;
	} 
}
?>

database.sql

CREATE TABLE IF NOT EXISTS `emaillist` (
 `emailadd` varchar(255) NOT NULL,
 PRIMARY KEY (`emailadd`)
) ENGINE=MyISAM DEFAULT CHARSET=utf8 COMMENT='List of all gotten emails';

CREATE TABLE IF NOT EXISTS `finishedurls` (
 `urlname` varchar(255) NOT NULL,
 PRIMARY KEY (`urlname`)
) ENGINE=MyISAM DEFAULT CHARSET=utf8 COMMENT='List of finished urls';

CREATE TABLE IF NOT EXISTS `workingurls` (
 `urlname` varchar(255) NOT NULL,
 PRIMARY KEY (`urlname`)
) ENGINE=MyISAM DEFAULT CHARSET=utf8 COMMENT='List of current working urls';

start.php

<!DOCTYPE HTML PUBLIC "-//W3C//DTD HTML 4.01 Transitional//EN" "http://www.w3.org/TR/html4/loose.dtd">
<html>
	<head>
	<meta http-equiv="Content-Type" content="text/html; charset=utf-8">
	</head>
	<body>
<?php
	error_reporting(0);
	$DB_USER = 'root';
	$DB_PASSWORD = '';
	$DB_HOST = 'localhost';
	$DB_NAME = 'test';
	$dbc = mysql_connect ($DB_HOST, $DB_USER, $DB_PASSWORD) or $error = mysql_error();
	mysql_select_db($DB_NAME) or $error = mysql_error();
	mysql_query("SET NAMES `utf8`") or $error = mysql_error();
	if($error){ die($error);}

	include('emailcrawler.php');

	$new = new scraper;
	// Start Path can be empty, which will be extracted from the start URL
	$new->setStartPath();
	//$new->setStartPath('http://geekiest.net');
	$new->startURL('http://geekiest.net/beautifulmails/');
	$new->startScraping();
?>
	</body>
</html>


&npsp;